NeXTSTEP: On a RPi 5

Previous Emulator Installation on a Raspberry Pi 5
In this guide, I’ll show you step-by-step how to install NeXTSTEP 3.3 on a Raspberry Pi 5 using the Previous emulator. This guide is based on Raspberry Pi OS Lite to create a minimal system that boots directly into the NeXTSTEP interface after startup.
Prerequisites
Hardware
- Raspberry Pi 5
- A fast SD card or USB drive (at least 32 GB recommended). An SSD will offer better performance but is not required.
- A suitable power supply for your Raspberry Pi 5 (5V/5A)
- Keyboard, mouse, and monitor
- A computer with an SD card reader or USB port
Software
- Raspberry Pi Imager
- Raspberry Pi OS Lite (64-bit)
- NeXTSTEP installation files
Since I am only focusing on setting up NeXTSTEP for a Cube, we only need the ISO image of the User Installation. We do not need a boot floppy image for this machine.
Where can I find NeXTSTEP files?
NeXTSTEP is often considered “abandonware” because it is no longer commercially available and is no longer maintained by the original manufacturer. An excellent and comprehensive source for all necessary images and other useful software is the archive at nextcomputers.org or the Internet Archive.
The NeXT ROM files are not needed, as they are supplied with the installation of Previous. Should you still wish to download them, you can find a bundle of different files for various models at macintoshrepository.org.
Installing and Setting Up Raspberry Pi OS Lite
1. Flash Raspberry Pi OS Lite to SD Card / USB Drive
Insert the SD card or connect the USB drive to your computer and start the Raspberry Pi Imager. I’ll skip a detailed explanation of how to use the Raspberry Pi Imager at this point and assume you are familiar with it.
Once the flashing is complete, you can boot your Raspberry Pi with this SD card / USB drive.
2. First Boot and System Update
The system will boot to a command line (terminal). Log in with the username and password you set during the flashing process and perform a full system update. This may take a moment.
sudo apt update && sudo apt full-upgrade -y
3. Restart the System
A restart is recommended after the update.
sudo reboot
Compiling and Installing the Previous Emulator
Before we download and compile the emulator, we need to install all the dependencies for compiling Previous:
sudo apt install -y \
build-essential \
cmake \
libasound2-dev \
libaudiofile-dev \
libdbus-1-dev \
libdirectfb-dev \
libgl1-mesa-dev \
libglu1-mesa-dev \
libopenal-dev \
libpcap-dev \
libpng-dev \
libpulse-dev \
libsdl2-dev \
libslirp-dev \
libts-dev \
libudev-dev \
raspberrypi-ui-mods \
subversion \
zlib1g-dev
Now we can clone the source code of the Previous emulator from SourceForge and configure the build:
svn checkout https://svn.code.sf.net/p/previous/code/trunk previous
cd previous && ./configure
After running configure, you should see something like this:
Libraries summary :
-------------------

  - sdl :	using SDL2 2.26.5
  - png :	found, allows to print to files using png
  - pcap :	found, allows networking without NAT
  - xattr.h :	found, allows netbooting from a folder
  - off_t :	8 byte, allows image files of 2 GiB and more

Configuration summary :
-----------------------

  - Build configuration : Release
  - Build macOS bundle :  Disabled
  - Tracing :             Enabled
  - Rendering thread :    Disabled

-- Configuring done
-- Generating done
-- Build files have been written to: /home/next/previous

Now you must type: make; make install
to actually build and install the software
Now you just need to compile and install the source code:
make && sudo make install
Preparing NeXTSTEP Installation Files
# Create a directory for NeXTSTEP files
mkdir ~/nextstep

# Change to the new directory
cd ~/nextstep

# Create a 2GB virtual hard disk image
dd if=/dev/zero of=next_hdd.img bs=1M count=2048
For NeXTSTEP to recognize and use the created image as a hard disk, we need to write a partition table. We’ll do this with fdisk.
fdisk next_hdd.img
We will simply create a single primary partition, pressing Return through all the suggested defaults, and let fdisk write this partition table to the image. Here is what my output for the command looks like:
Welcome to fdisk (util-linux 2.38.1).
Changes will remain in memory only, until you decide to write them.
Be careful before using the write command.

Device does not contain a recognized partition table.
Created a new DOS (MBR) disklabel with disk identifier 0x32feeeab.

Command (m for help): n
Partition type
   p   primary (0 primary, 0 extended, 4 free)
   e   extended (container for logical partitions)
Select (default p): p
Partition number (1-4, default 1):
First sector (2048-4194303, default 2048):
Last sector, +/-sectors or +/-size{K,M,G,T,P} (2048-4194303, default 4194303):

Created a new partition 1 of type 'Linux' and of size 2 GiB.

Command (m for help): w
The partition table has been altered.
Syncing disks.
Now, download the NeXTSTEP Installation Image and copy it to the Raspberry Pi. Additionally, you can also download the CD image with the Developer Tools and copy it to the Raspberry Pi as well. The easiest way to copy is using scp (we assume your user on the Raspberry Pi is next and the Pi is named cube).
Copy the installation CD:
scp ~/Downloads/NeXTSTEP_3.3_User.iso next@cube.local:/home/next/nextstep/
Optionally, copy the Developer Tools:
scp ~/Downloads/NeXTSTEP_3.3_Developer.iso next@cube.local:/home/next/nextstep/
You may need to adjust the ~/Downloads path depending on your operating system and where your downloads are saved.
Optimizing the Boot Process
We want to make the boot process on the Pi as fast as possible and display as little information as possible. We can achieve this by adding an extra boot parameter to the kernel.
To do this, open the following file:
sudo nano /boot/firmware/cmdline.txt
Inside, there is a single line with many parameters, each separated by a space. Go to the very end of this line and append the parameter quiet loglevel=3.
Save the file and close the editor.
Preparing Autostart
Since we installed Raspberry Pi OS Lite (the version without a graphical desktop) and only post-installed a minimal GUI in step 3 with the raspberrypi-ui-mods package, our system still boots directly into the console. We want to change that. The OS should boot into the graphical user interface and perform an auto-login.
To achieve this, we need to make two changes in the console via raspi-config.
Log in to the Pi directly or via SSH, and run raspi-config:
sudo raspi-config
You should see something like this:
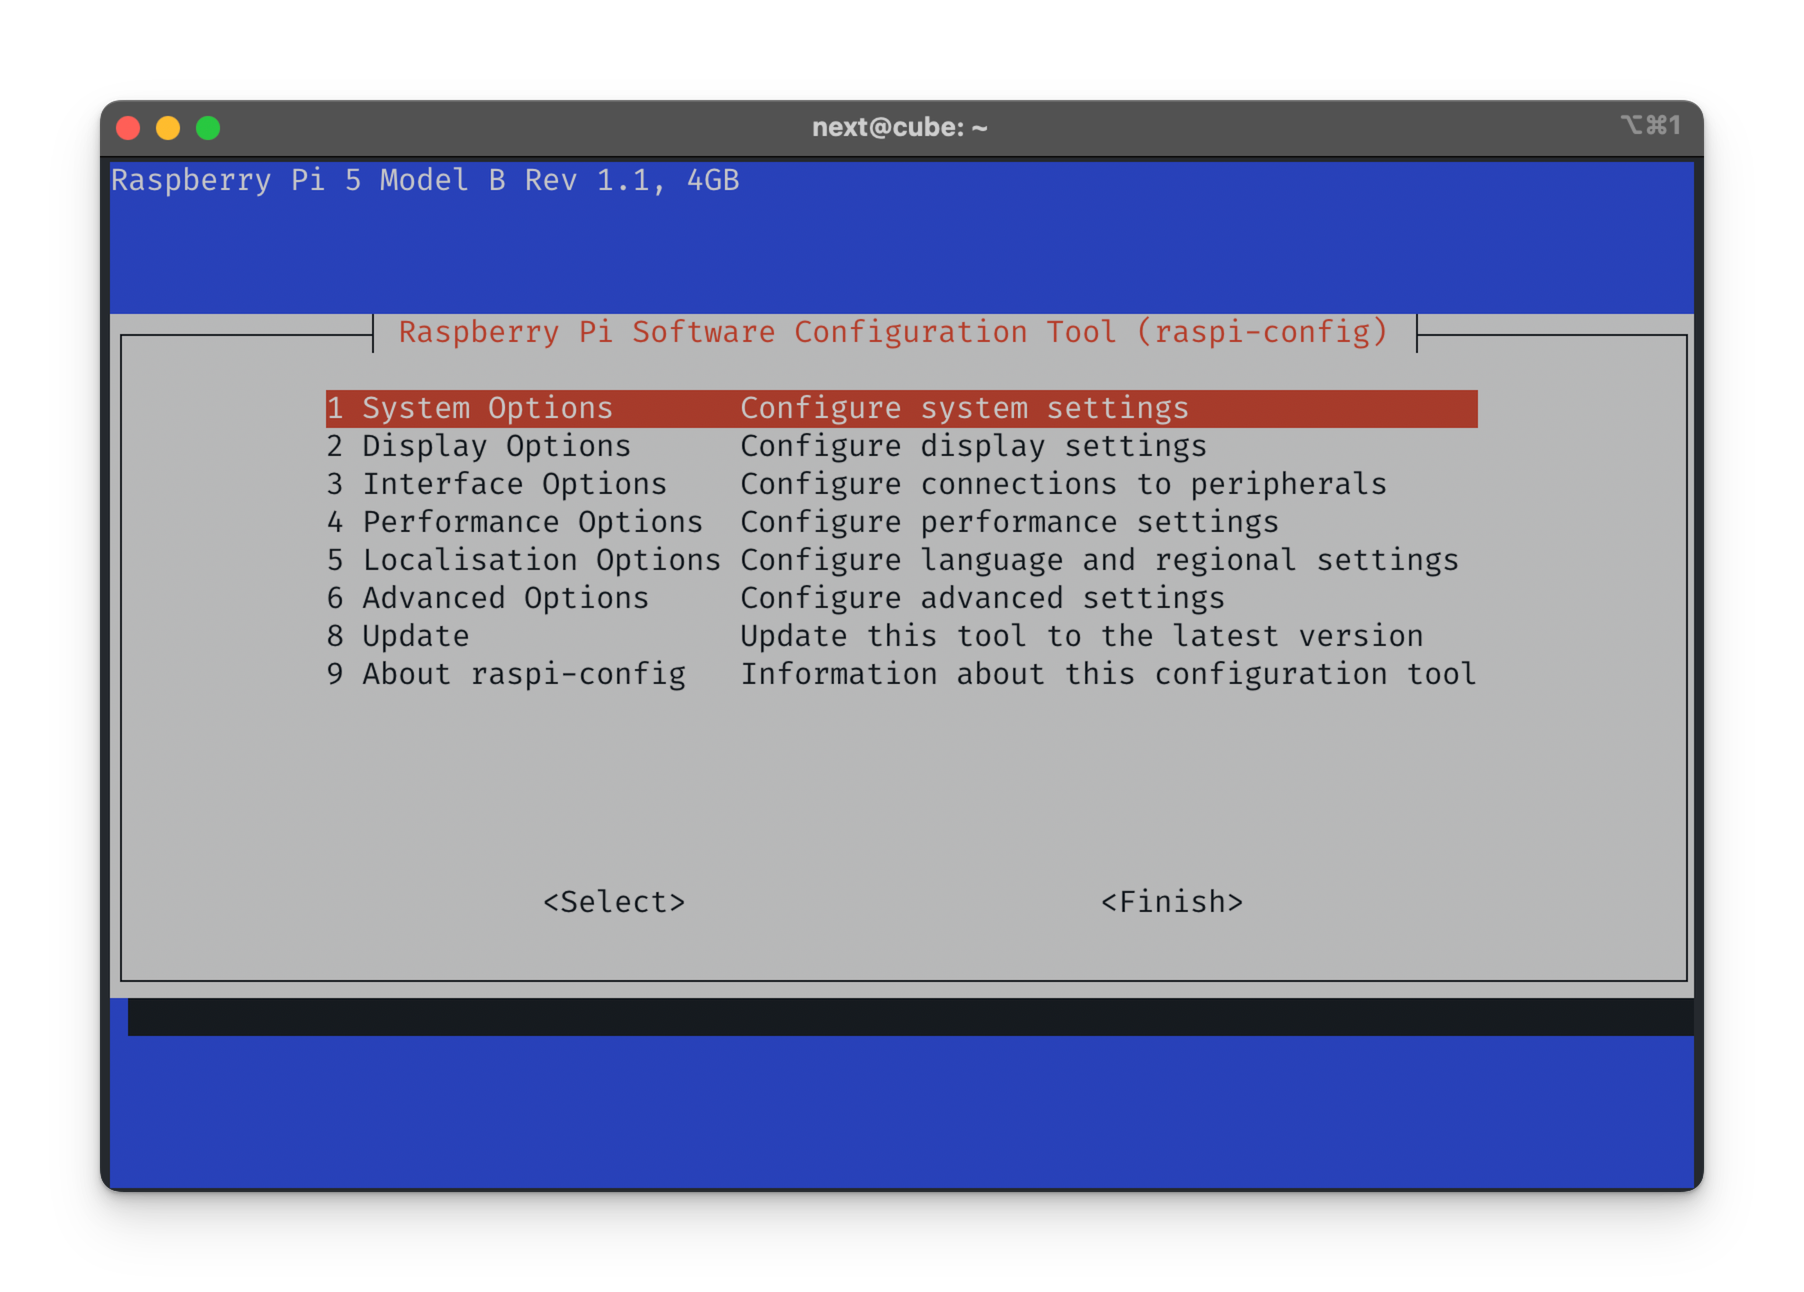
Now, go through the steps described below:
- 1 System Options
- S5 Boot / Auto Login
- B2 Console Autologin → OK
- 1 System Options
- S5 Boot / Auto Login
- B4 Desktop Autologin → Yes
- Finish
- “Would you like to reboot now?” → Yes
Your Pi will now restart and should automatically land on the desktop, logged in with your next user.
Previous Emulator Configuration
To prevent Previous from starting with the default settings the first time, we will provide it with a configuration. This will be stored on the Pi under ~/.config/previous/. To be safe, let’s create this directory first.
mkdir -p ~/.config/previous/
Then open the (empty) config file:
nano ~/.config/previous/previous.cfg
Copy this content into it:
[Log]
bConfirmQuit = TRUE
bConsoleWindow = FALSE

[ConfigDialog]
bShowConfigDialogAtStartup = FALSE

[Screen]
nMonitorType = 2
nMonitorNum = 0
bFullScreen = TRUE
bShowStatusbar = FALSE
bShowDriveLed = FALSE

[ShortcutsWithModifiers]
kOptions = O
kFullScreen = F
kMouseMode = M
kColdReset = C
kScreenshot = G
kRecord = R
kSound = S
kPause = P
kDebuggerM68K = D
kDebuggerI860 = I
kQuit = Q
kDimension = N
kStatusbar = B

[ShortcutsWithoutModifiers]
kOptions = F12
kFullScreen = F11
kMouseMode =
kColdReset =
kScreenshot = F4
kRecord = F5
kSound =
kPause =
kDebuggerM68K =
kDebuggerI860 =
kQuit =
kDimension =
kStatusbar = F10

[Boot]
nBootDevice = 1
bEnableDRAMTest = FALSE
bEnablePot = FALSE
bEnableSoundTest = TRUE
bEnableSCSITest = TRUE
bLoopPot = FALSE
bVerbose = FALSE
bExtendedPot = FALSE
bVisible = FALSE

[HardDisk]
szImageName0 = /home/next/nextstep/NeXTSTEP_3.3_HD-Image_Previous_2GB.img
nDeviceType0 = 1
bDiskInserted0 = TRUE
bWriteProtected0 = FALSE
szImageName1 =
nDeviceType1 = 0
bDiskInserted1 = FALSE
bWriteProtected1 = FALSE
szImageName2 =
nDeviceType2 = 0
bDiskInserted2 = FALSE
bWriteProtected2 = FALSE
szImageName3 =
nDeviceType3 = 0
bDiskInserted3 = FALSE
bWriteProtected3 = FALSE
szImageName4 =
nDeviceType4 = 0
bDiskInserted4 = FALSE
bWriteProtected4 = FALSE
szImageName5 =
nDeviceType5 = 0
bDiskInserted5 = FALSE
bWriteProtected5 = FALSE
szImageName6 =
nDeviceType6 = 0
bDiskInserted6 = FALSE
bWriteProtected6 = FALSE
nWriteProtection = 0

[System]
nMachineType = 1
bColor = TRUE
bTurbo = TRUE
bNBIC = TRUE
bADB = TRUE
nSCSI = TRUE
nRTC = TRUE
nCpuLevel = 4
nCpuFreq = 33
bCompatibleCpu = TRUE
bRealtime = FALSE
nDSPType = 2
bDSPMemoryExpansion = TRUE
n_FPUType = 68040
bCompatibleFPU = TRUE
bMMU = TRUE

[Dimension]
bI860Thread = TRUE
bMainDisplay = TRUE
nMainDisplay = 0
bEnabled0 = TRUE
nMemoryBankSize00 = 16
nMemoryBankSize01 = 16
nMemoryBankSize02 = 0
nMemoryBankSize03 = 0
szRomFileName0 = /usr/local/share/previous/ND_step1_v43.BIN
bEnabled1 = FALSE
nMemoryBankSize10 = 4
nMemoryBankSize11 = 4
nMemoryBankSize12 = 4
nMemoryBankSize13 = 4
szRomFileName1 = /usr/local/share/previous/ND_step1_v43.BIN
bEnabled2 = FALSE
nMemoryBankSize20 = 4
nMemoryBankSize21 = 4
nMemoryBankSize22 = 4
nMemoryBankSize23 = 4
szRomFileName2 = /usr/local/share/previous/ND_step1_v43.BIN
IMPORTANT: Under the “[HardDisk]” section, adjust the value for szImageName0. Here you must enter your empty HD image into which you want to install NeXTSTEP.
Setting Up Autostart via “Kiosk Mode”
Step 1: Create the Autostart Directory
We will create a configuration file in your user’s autostart directory. If the folder doesn’t exist yet, create it.
mkdir -p ~/.config/autostart
Step 2: Create the Autostart File
Now create a .desktop file. This is a type of shortcut that the desktop automatically executes on startup.
nano ~/.config/autostart/previous.desktop
Step 3: Add Content to the Autostart File
Paste the following content completely into the empty file.
[Desktop Entry]
Type=Application
Name=Previous NeXT Emulator
Comment=Starts the Previous Emulator in fullscreen
Exec=/usr/local/bin/previous
Terminal=false
Save the file and close the editor. Everything is now ready. Restart your Raspberry Pi.
sudo reboot
After the restart, your Raspberry Pi should boot with minimal text output and then switch directly to the NeXTSTEP interface.
Conclusion
You did it! Have fun with NeXTSTEP on your Raspberry Pi. 🎉
Watch the entire boot process here: